- Xamarin
- Xamarin.Forms
Dans ce tutoriel, nous allons découvrir comment télécharger un fichier avec Xamarin.Forms et suivre le statut du téléchargement grâce à une barre de progression.
Mise en place du projet
Structure
Tout d’abord, configurons une solution Xamarin.Forms comme ceci:
 |-XFDownloadProject
    |-XFDownloadProject
    |-XFDownloadProject.Forms
    |-XFDownloadProject.Android
    |-XFDownloadProject.iOS
    |-XFDownloadProject.UWP
La structure est composée d’une librairie .Net Standard pour le code partagé (XFDownloadProject), une autre pour les vues de Xamarin.Forms
(XFDownloadProject.Forms) et les projets des trois plateformes : iOS, Android et UWP.
L’idée derrière cette structure est de pouvoir utiliser notre librairie XFDownloadProject dans d’autres projets Xamarin.iOS, Xamarin.Android ou UWP.
Ajoutons le projet XFDownloadProject.Forms en tant que dépendance de tous les projets de plateforme.
Nuget
Pour ce tutoriel, nous utiliserons l’un de mes packages préférés : MvvmLightLibs, pour l’injection de dépendance, et les RelayCommand.
Alors, installons-le dans tous les projets, voici le lien : MvvmLightLibsStd10
Les services
Il est temps de configurer notre service de téléchargement, d’abord créons une interface appelée : IDownloadService et ajoutons cette méthode :
public interface IDownloadService
{
    Task DownloadFileAsync(string url, IProgress<double> progress, CancellationToken token);
}
Implémentons cette interface dans une classe DownloadService:
public class DownloadService : IDownloadService
{
    private HttpClient _client;

    private readonly IFileService _fileService;

    public DownloadService(IFileService fileService)
    {
        _client = new HttpClient();
        _fileService = fileService;
    }

    public async Task DownloadFileAsync(string url, IProgress<double> progress, CancellationToken token)
    {
    }
}
Comme vous pouvez le voir ci-dessus, nous configurons le HttpClient que nous allons utiliser pour télécharger un fichier, et un IFileService que j’expliquerai plus en détails plus tard.
Maintenant, implémentons notre méthode DownloadFileAsync:
private int bufferSize = 4095;

public async Task DownloadFileAsync(string url, IProgress<double> progress, CancellationToken token)
{
    try
    {
        // Etape 1 : Get call
        var response = await _client.GetAsync(url, HttpCompletionOption.ResponseHeadersRead, token);

        if (!response.IsSuccessStatusCode)
        {
            throw new Exception(string.Format("The request returned with HTTP status code {0}", response.StatusCode));
        }

        // Etape 2 : Filename
        var fileName = response.Content.Headers?.ContentDisposition?.FileName ?? "tmp.zip";

        // Etape 3 : Get total of data
        var totalData = response.Content.Headers.ContentLength.GetValueOrDefault(-1L);
        var canSendProgress = totalData != -1L && progress != null;

        // Etape 4 : Get total of data
        var filePath = Path.Combine(_fileService.GetStorageFolderPath(), fileName);

        // Etape 5 : Download data
        using (var fileStream = _fileService.OpenStream(filePath))
        {
            using (var stream = await response.Content.ReadAsStreamAsync())
            {
                var totalRead = 0L;
                var buffer = new byte[bufferSize];
                var isMoreDataToRead = true;

                do
                {
                    token.ThrowIfCancellationRequested();

                    var read = await stream.ReadAsync(buffer, 0, buffer.Length, token);

                    if (read == 0)
                    {
                        isMoreDataToRead = false;
                    }
                    else
                    {
                        // Write data on disk.
                        await fileStream.WriteAsync(buffer, 0, read);

                        totalRead += read;

                        if (canSendProgress)
                        {
                            progress.Report((totalRead * 1d) / (totalData * 1d) * 100);
                        }
                    }
                } while (isMoreDataToRead);
            }
        }
    }
    catch (Exception e)
    {
        // Manage the exception as you need here.
        System.Diagnostics.Debug.WriteLine(e.ToString());
    }
}
Basé sur le numéro d’étape dans le code ci-dessus nous avons:
Etape 1 :
Nous faisons l’appel HTTP GET au serveur, et nous attendons un code d’état de succès dans le Header HTTP pour commencer le téléchargement.
Etape 2 :
Nous définissons le nom de notre contenu que nous téléchargeons. Si vous avez une belle API, vous aurez le nom du fichier dans le HTTP Header,
comme le fichier zip que nous allons télécharger de l’un de mes précédents post sur Github:
Content-Disposition → attachment; filename=XamarinAndroidParcelable-master.zip
Si aucun Content-Disposition n’est retourné par l’API, nous utiliserons tmp.zip comme nom de fichier par défaut.
Etape 3 :
Nous obtenons la longueur du fichier que nous allons télécharger, en utilisant également Content-Disposition.
Content-Length → 56159
Etape 4 :
Récupérons le chemin de notre fichier et du dossier de destination. Pour cela, créons une interface dans notre code partagé appelée IFileService et ajoutons cette méthode :
public interface IFileService
{
    String GetStorageFolderPath();
}
Nous allons implémenter cette interface dans chaque plateforme pour sauvegarder nos données. Créons donc une classe FileService dans nos projets Xamarin.iOS, Xamarin.Android et UWP, qui hérite de IFileService:
Voici l’implémentation pour Xamarin.iOS:
public string GetStorageFolderPath()
{
    return Environment.GetFolderPath(Environment.SpecialFolder.Personal);
}
Pour Xamarin.Android :
public string GetStorageFolderPath()
{
    string docFolder = Environment.GetFolderPath(Environment.SpecialFolder.Personal);
    string libFolder = Path.Combine(docFolder, "..", "Library");
    return libFolder;
}
Et enfin pour UWP :
public string GetStorageFolderPath()
{
    return Windows.Storage.ApplicationData.Current.LocalFolder.Path;
}
Etape 5 :
Dernière étape, on ouvre un FileStream pour sauvegarder nos données dedans. Pour ce faire, ajoutons cette méthode à notre DownloadService :
private Stream OpenStream(string path)
{
    return new FileStream(path, FileMode.OpenOrCreate, FileAccess.Write, FileShare.None, bufferSize);
}
Nous attendons plus de données et signalons l’avancée grâce au paramètre progres qui sera utilisé pour communiquer l’avancement du téléchargement à notre vue.
Le ViewModel
Créons un ViewModel appelé DownloadViewModel pour notre application. Nous allons créer une commande appelée StartDownloadCommand en utilisant RelayCommand
de MvvmLightLibs. Cette commande va exécuter la méthode StartDownloadAsync:
private double _progressValue;
public double ProgressValue
{
    get { return _progressValue; }
    set { Set(ref _progressValue, value); }
}

private bool _isDownloading;
public bool IsDownloading
{
    get { return _isDownloading; }
    set { Set(ref _isDownloading, value); }
}

private readonly IDownloadService _downloadService;

public ICommand StartDownloadCommand { get; }

public DownloadViewModel(IDownloadService downloadService)
{
    _downloadService = downloadService;
    StartDownloadCommand = new RelayCommand(async () => await StartDownloadAsync());
}

public async Task StartDownloadAsync()
{
    var progressIndicator = new Progress<double>(ReportProgress);
    var cts = new CancellationTokenSource();
    try
    {
        IsDownloading = true;

        var url = "https://github.com/damienaicheh/XamarinAndroidParcelable/archive/master.zip";

        await _downloadService.DownloadFileAsync(url, progressIndicator, cts.Token);
    }
    catch (OperationCanceledException ex)
    {
        System.Diagnostics.Debug.WriteLine(ex.ToString());
        //Manage cancellation here
    }
    finally
    {
        IsDownloading = false;
    }
}

internal void ReportProgress(double value)
{
    ProgressValue = value;
}
La méthode ReportProgress actualisera la valeur de progression pour l’afficher dans la vue.
La vue
Dans le projet XFDownloadProject.Forms, créons une ContentPage et ajoutons cette vue :
<?xml version="1.0" encoding="utf-8"?>
<ContentPage xmlns="http://xamarin.com/schemas/2014/forms"
             xmlns:x="http://schemas.microsoft.com/winfx/2009/xaml"
             xmlns:local="clr-namespace:XFDownloadProject"
             x:Class="XFDownloadProject.MainPage"
             xmlns:converters="using:XFDownloadProject.Converters">

    <ContentPage.Resources>
        <converters:InverterBooleanConverter x:Key="InverterBooleanConverter" />
        <converters:ValueProgressBarConverter x:Key="ValueProgressBarConverter" />
    </ContentPage.Resources>

    <Grid>
        <Grid.RowDefinitions>
            <RowDefinition />
            <RowDefinition />
        </Grid.RowDefinitions>

        <Label Text="Download a file with a progress bar in Xamarin Forms !" FontSize="Large"
               HorizontalOptions="Center" VerticalOptions="Center"
               HorizontalTextAlignment="Center"/>

        <StackLayout Grid.Row="1" Spacing="20">

            <ProgressBar Progress="{Binding ProgressValue, Converter={StaticResource ValueProgressBarConverter}}" Margin="10,0"/>

            <Label Text="{Binding ProgressValue, StringFormat='{0:F2}%'}" HorizontalOptions="Center" />

            <Button Text="Start Download"
                    Command="{Binding StartDownloadCommand}"
                    IsEnabled="{Binding IsDownloading, Converter={StaticResource InverterBooleanConverter}}" />

        </StackLayout>

    </Grid>
</ContentPage>
Vous remarquerez probablement qu’il y a deux convertisseurs utilisés, un pour inverser le bool (pour désactiver le bouton pendant le téléchargement) et un pour convertir le ProgressValue dans le bon format pour la ProgressBar.
Voici les deux implémentations que nous allons placer dans un dossier Converters:
InverterBooleanConverter :
public class InverterBooleanConverter : IValueConverter
{
    public object Convert(object value, Type targetType, object parameter, System.Globalization.CultureInfo culture)
    {
        return !(bool)value;
    }
    public object ConvertBack(object value, Type targetType, object parameter, System.Globalization.CultureInfo culture)
    {
        return new NotImplementedException();
    }
}
ValueProgressBarConverter :
public class ValueProgressBarConverter : IValueConverter
{
    public object Convert(object value, Type targetType, object parameter, System.Globalization.CultureInfo culture)
    {
        return (double)value / 100;
    }
    public object ConvertBack(object value, Type targetType, object parameter, System.Globalization.CultureInfo culture)
    {
        return new NotImplementedException();
    }
}
Injection de dépendance
Pour pouvoir démarrer le projet, nous devons injecter nos ViewModels et nos services. Pour cela nous devons créer une classe Bootstrap dans le
code partagé, et injecter nos classes comme ceci :
public class Bootstrap
{
    private static Bootstrap instance;

    public static Bootstrap Instance
    {
        get
        {
            if (instance == null)
                instance = new Bootstrap();

            return instance;
        }
    }

    public void Setup()
    {
        SimpleIoc.Default.Register<IDownloadService, DownloadService>();
        SimpleIoc.Default.Register<DownloadViewModel>();
    }
}
Vous avez probablement remarqué que nous n’injectons pas le FileService dans la méthode Setup. C’est parce que c’est spécifique à la plateforme, donc nous avons besoin
de l’injecter dans les différents projets des plateformes:
Pour Xamarin.iOS dans la classe AppDelegate :
public override bool FinishedLaunching(UIApplication app, NSDictionary options)
{
    global::Xamarin.Forms.Forms.Init();

    SimpleIoc.Default.Register<IFileService, FileService>();

    LoadApplication(new App());

    return base.FinishedLaunching(app, options);
}
Pour Xamarin.Android dans la classe MainActivity :
protected override void OnCreate(Bundle bundle)
{
    TabLayoutResource = Resource.Layout.Tabbar;
    ToolbarResource = Resource.Layout.Toolbar;

    base.OnCreate(bundle);

    global::Xamarin.Forms.Forms.Init(this, bundle);

    SimpleIoc.Default.Register<IFileService, FileService>();

    LoadApplication(new App());
}
Et enfin pour UWP dans la classe App.xaml.cs :
protected override void OnLaunched(LaunchActivatedEventArgs e)
{
    Frame rootFrame = Window.Current.Content as Frame;

    // Do not repeat app initialization when the Window already has content,
    // just ensure that the window is active
    if (rootFrame == null)
    {
        // Create a Frame to act as the navigation context and navigate to the first page
        rootFrame = new Frame();

        rootFrame.NavigationFailed += OnNavigationFailed;

        Xamarin.Forms.Forms.Init(e);
        SimpleIoc.Default.Register<IFileService, FileService>();
    //...
}
Puis dans notre App.xaml de notre projet XFDownloadProject.Forms nous devons appeler la méthode Setup :
public partial class App : Application
{
    public App()
    {
        InitializeComponent();
        // MainPage must be not null for UWP.
        MainPage = new ContentPage();
    }

    protected override void OnStart()
    {
        // Handle when our app starts
        Bootstrap.Instance.Setup();

        MainPage = new MainPage();
    }
    //...
}
Maintenant retournons dans MainPage.xaml.cs et dans le constructeur nous pouvons ajouter le BindingContext en récupérant une instance de DownloadViewModel fourni
par notre injecteur de dépendance :
this.BindingContext = SimpleIoc.Default.GetInstance<DownloadViewModel>();
Run our project
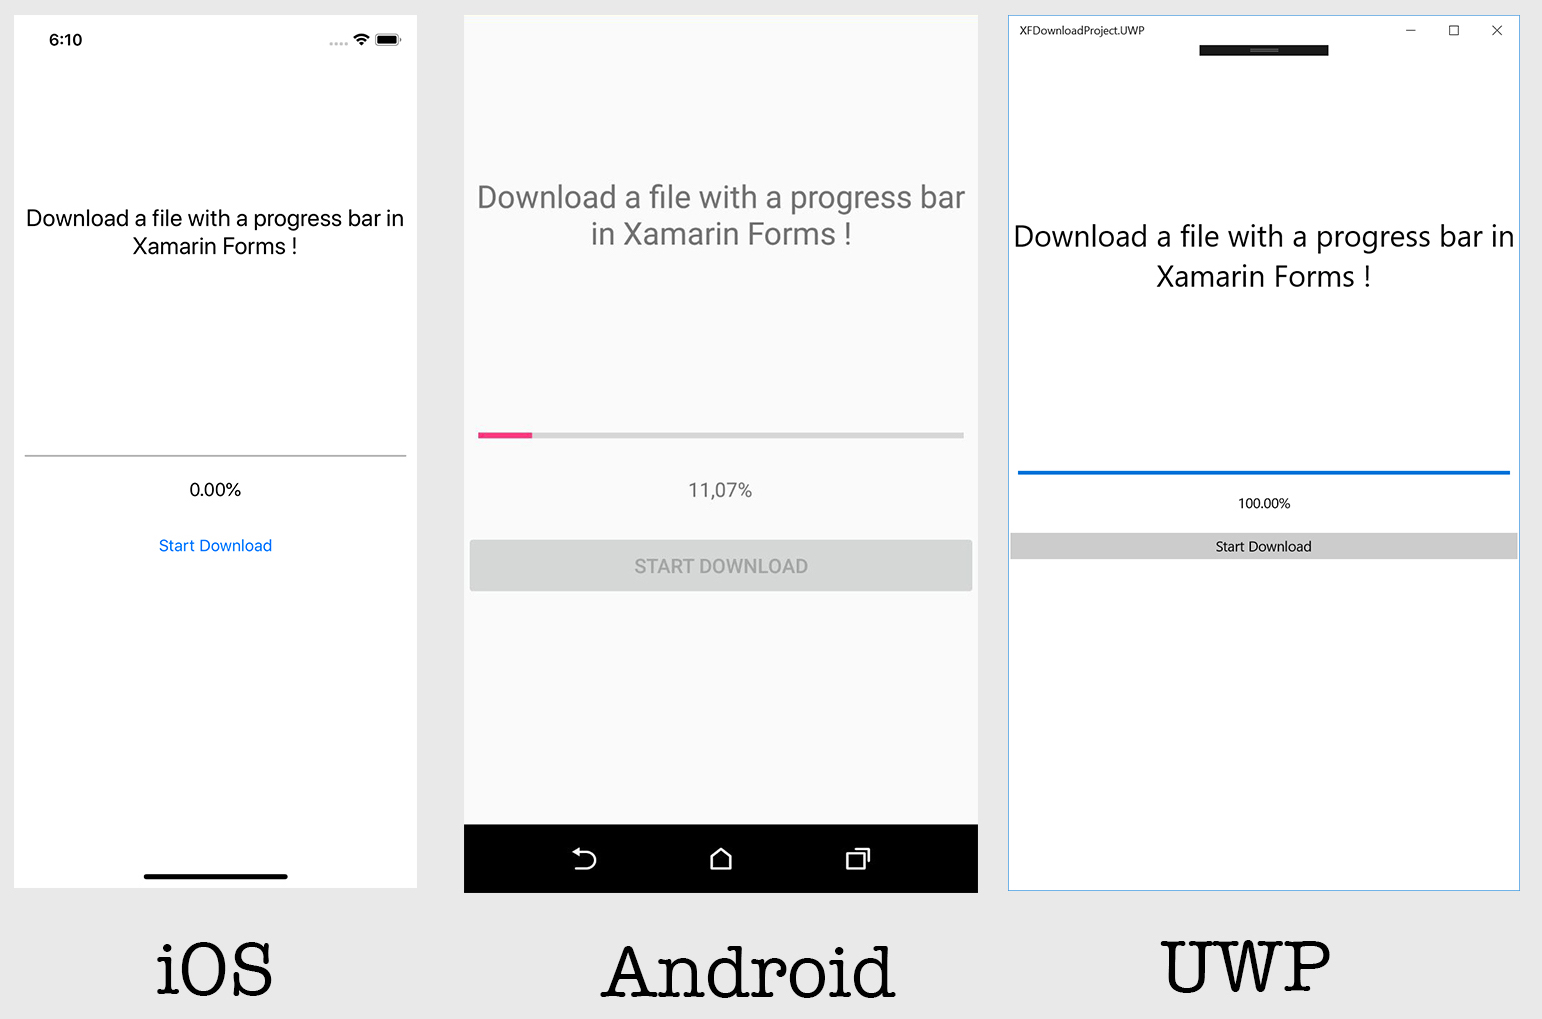
C’est le moment de lancer notre projet et de découvrir ce que nous avons fait !
Je vous conseille de ne pas utiliser un émulateur Android pour le tester car il ne sera probablement pas capable de résoudre l’URL correctement et vous obtiendrez une erreur comme celle-ci :
System.Net.Http.HttpRequestException: An error occurred while sending the request —> System.Net.WebException: Error: NameResolutionFailure
Donc, si vous le pouvez, utilisez un périphérique physique. Si tout va bien, vous pourriez voir quelque chose comme cela :
Vous trouverez un exemple de code sur ce répertoire Github.
Happy codding !
Vous avez aimé ce tutoriel ? Laissez une étoile sur le répertoire Github associé !