- Azure
- Azure DevOps
- iOS
- Android
When you develop a mobile application you always have different versions and each one has a specific environment. During the entire life of your project you switch between each versions to try new features or to correct some bugs. To do that you often have different versions of your application in the same device and you have a different identifier for each versions. This will end up with this kind of problematics:
![]()
As you can see above you can’t easily know on your device which icon correspond to a version of your application. Another solution will be to differenciate the name for each version of your application but if it’s too long it will be cut off on display. So why not just add a banner above of your application icon?
Introducing Launch Icon Badge task
To solve this problem I developed a new Azure DevOps task called Launch Icon Badge, easy to use in your pipeline and free. This task provide you a way to add the environment version name and the version number directly on your application icon. This work only for png files.
Note that this task will work not only for a mobile application project but also for all projects that have a use of icons whatever the technology you use.
Basic usage
First of all, go to your Azure DevOps and install the Launch Icon Badge extension into your organisation.
![]()
To use it in your azure-pipelines.yml you just have to call it like this:
- task: LaunchIconBadge@1
  inputs:
    bannerVersionNamePosition: 'bottomRight'
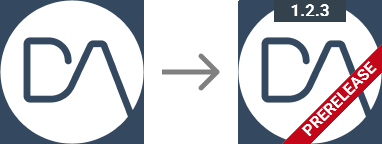
    bannerVersionNameText: 'Prerelease'
    bannerVersionNumberPosition: 'top'
    bannerVersionNumberText: '1.2.3'
By default all the png files in your projects will be edited, here is the result of the example code above:

Advanced options
Below you can find all options for this task:
- task: LaunchIconBadge@1
  inputs:
    sourceFolder: '$(Build.SourcesDirectory)' # Optional. Default is: $(Build.SourcesDirectory)
    contents: '**/*.png' # Optional. Default is:  '**/*.png'
    bannerVersionNamePosition: 'bottomRight' # Options: topLeft, topRight, bottomRight, bottomLeft. Default is: 'bottomRight'
    bannerVersionNameText: 'Prerelease'  # Optional. Default is: ''
    bannerVersionNameColor: '#C5000D' # Optional. Default is: '#C5000D'
    bannerVersionNameTextColor: '#FFFFFF' # Optional. Default is: '#FFFFFF'
    bannerVersionNumberPosition: 'top' # Optional. top, bottom, center, none. Default is: 'none'
    bannerVersionNumberText: '1.2.3' # Optional. Default is: ''
    bannerVersionNumberColor: '#34424F' # Optional. Default is: '#34424F'
    bannerVersionNumberTextColor: '#FFFFFF' # Optional. Default is: '#FFFFFF'
- The
sourceFolderwill be by default, the build directory of your Azure Pipeline. - The
contentswhich by default will modify all the png files of your project. - The
bannerVersionNamePositionwill specify the corner of your choice to draw the banner. Options:topLeft,topRight,bottomRight,bottomLeft. - The
bannerVersionNumberPositionwill specify the position of the version number banner. The banner can be simply hidden. Options:top,bottom,center,none. - You can customize the background color and text color of your banners using a hexadecimal code.
Here you have some examples of what you can do:
![]()
Go further
In my previous tutorial I introduced another Azure DevOps task called ExtractVersionFromTag to get the version of your application from your last Git tag. You can combine these two tasks and automatically define the bannerVersionNumberText like this:
- task: ExtractVersionFromTag@1

- task: LaunchIconBadge@1
  inputs:
    bannerVersionNamePosition: 'bottomRight'
    bannerVersionNameText: 'Prerelease'
    bannerVersionNumberPosition: 'top'
    bannerVersionNumberText: '$(MAJOR).$(MINOR).$(PATCH)-($(NUMBER_OF_COMMITS))'
Final touch
You will find examples of use in the Github project repository. Feel free to contribute to this project if you want.
Happy coding!