- Azure
- Azure DevOps
It is not easy to create generic Azure Pipelines YAML templates and maximize its usability accross your projects. In this tutorial, we are going to demonstrate how to create flexible templates that can fit as many of your projects as possible.
Kind Reminder
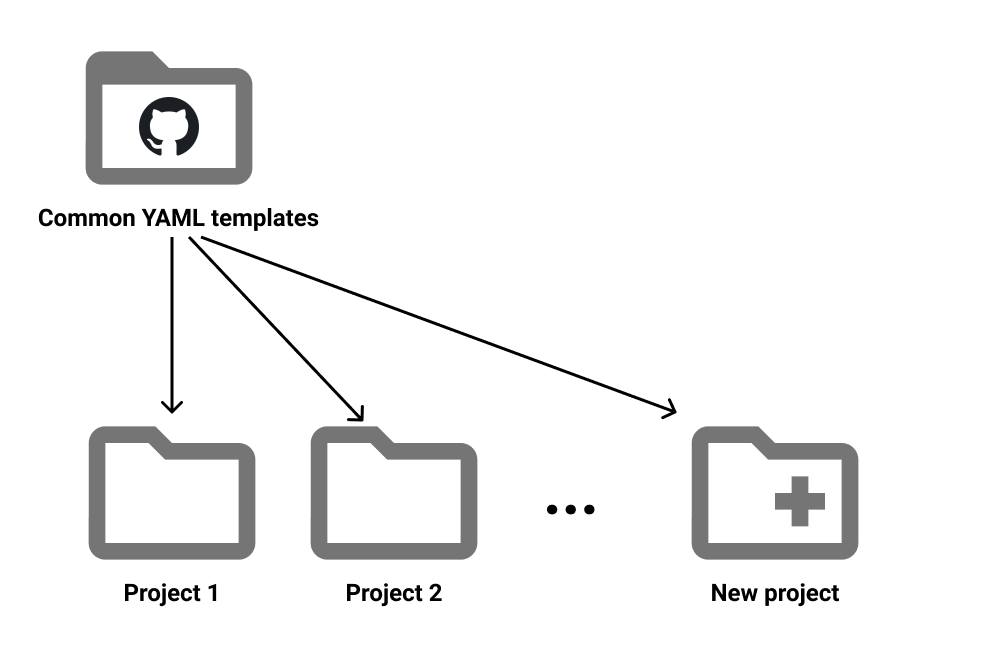
It is necessary to create your own set of templates in order to reuse your YAML templates, they can be hosted in a private or public Git repository for instance.

As you can notice from above, each one of your projects references your common templates project. Thus, each time you want to setup a new pipeline for your project, it will be an effortless process much faster than before because you will use the same base of YAML template.
It is highly needed to have the most generic template to fit the maximum cases your project has in order to maximize the usage of reusable YAML templates. So you are facing an issue: how can you avoid having duplicates of your templates so that you will be able to extend them?
Overview
With that in mind, let’s take an example:
You have one project that already uses a single common template of yours called job-build.yml, to build your application. In your common templates you have all steps you need:
# job-build.yml
parameters:
  # list of parameters needed here

jobs:
- job:
  displayName: 'Build Project'
  steps:

    - task: Bash@3
      displayName: 'Restore packages'
      inputs:
        targetType: 'inline'
        script: |
          echo Restore all packages needed

    - task: Bash@3
      displayName: 'Install certificates'
      inputs:
        targetType: 'inline'
        script: |
          echo Install all the certificates needed

    - task: Bash@3
      displayName: 'Build'
      inputs:
        targetType: 'inline'
        script: |
          echo This script represents the build tasks

    - task: Bash@3
      displayName: 'Publish'
      inputs:
        targetType: 'inline'
        script: |
          echo This script represents the publish tasks
And you use it like this:
stages:
  - stage: Build
    jobs:
    - template: job-build.yml@templates
      parameters:
        # Pass all parameters here
Now, imagine your second project needs to add a few more steps to the job-build.yml to fit its needs. What can you do?
The first idea you will probably have is to copy paste your generic templates into your second project and add the extra steps needed. However, the problem with this approach is that:
- you will lose the potential evolutions of your common templates repository.
- you create a specificity for this project which implies a loss of consistency with other projects.
- you lose maintainability.
So, how can we make it more flexible?
Solution
The recommended solution to this issue is that you need to add different entry points in your generic templates that give you the ability to add custom configuration for all the projects, if needed.
You need to add custom parameters which are a list of steps at the top of your template like this:
parameters:
  myCustomSteps: []
then you can use it inside your template like this:
- ${{ parameters.myCustomSteps }}
Now, let’s imagine a list of steps entries and some examples of usage that you can have:
onBegin: You can install more certificatespreBuild: Install some custom packages, define configuration, add icon banner..postBuild: Push a tag if the build succeededprePublish: Create a specific folder structure, rename the artifacts just generatedonEnd: Clean actions, publish on another endpoint
Then go back to our job-build.yml template here is an example of what you can have:
# job-build.yml
parameters:
  preBuild: []
  postBuild: []

jobs:
- job:
  displayName: 'Build Project'
  steps:

    - task: Bash@3
      displayName: 'Restore packages'
      inputs:
        targetType: 'inline'
        script: |
          echo Restore all packages needed
    - task: Bash@3
      displayName: 'Install certificates'
      inputs:
        targetType: 'inline'
        script: |
          echo Install all the certificates needed

    - ${{ parameters.preBuild }} # Here we start the prebuild steps

    - task: Bash@3
      displayName: 'Build'
      inputs:
        targetType: 'inline'
        script: |
          echo This script represents the build tasks

    - ${{ parameters.postBuild }} # Here we start the postbuild steps

    - task: Bash@3
      displayName: 'Publish'
      inputs:
        targetType: 'inline'
        script: |
          echo This script represents the publish tasks
It’s effortless to insert more steps:
stages:
  - stage: Build
    jobs:
    - template: job-build.yml@templates
      parameters:
        preBuild:
          - task: Bash@3
            displayName: 'Add custom configuration'
            inputs:
              targetType: 'inline'
              script: |
                echo Add a specific configuration
          - task: Bash@3
            displayName: 'Define application version'
            inputs:
              targetType: 'inline'
              script: |
                echo Define the application version automatically
        postBuild:
          - task: Bash@3
            displayName: 'Push git tag'
            inputs:
              targetType: 'inline'
              script: |
                echo Push a tag to the Git repository
The advantages of this solution are:
- you have flexible templates.
- the reusability across the project increases.
- you can easily debug templates by placing some extra steps.
- you do not face any issues if you do not specify values to the steps’ parameters, they will just be ignored.
Final touch
By reaching this step, you have the ability to customize your YAML pipelines as you need. As usual, you can find a sample source code in the associated Github repository.
Happy coding!
You liked this tutorial? Leave a star in the associated Github repository!