- Azure
- Azure DevOps
- Docker
When building projects on Azure DevOps you may already noticed that you have two ways to test, build and deploy your project:
- Use your own pools of agents
- Use the online pools of agents
With the first option you have to maintain the agents and probably buy or rent them and then install the tools that you need. With the second option you are limited by the tools installed by default on each agent. That being said, what other options do you have? Let’s take a look at container jobs!
Create your own Docker containers
Container jobs allows you to run your job inside a Docker image. With this approach you just need a pool of agents that can run Docker. What are the benefits of it?
- You are not dependent of the tooling of the agent
- You can create your own Docker image that fits your needs
- Those images will work online or in your own pools of agents so you can switch when you want. So it’s not a waste of time.
If you can containerize the technology you use with Docker you can use this technique.
Here is a little shema to helps you understand the concept:
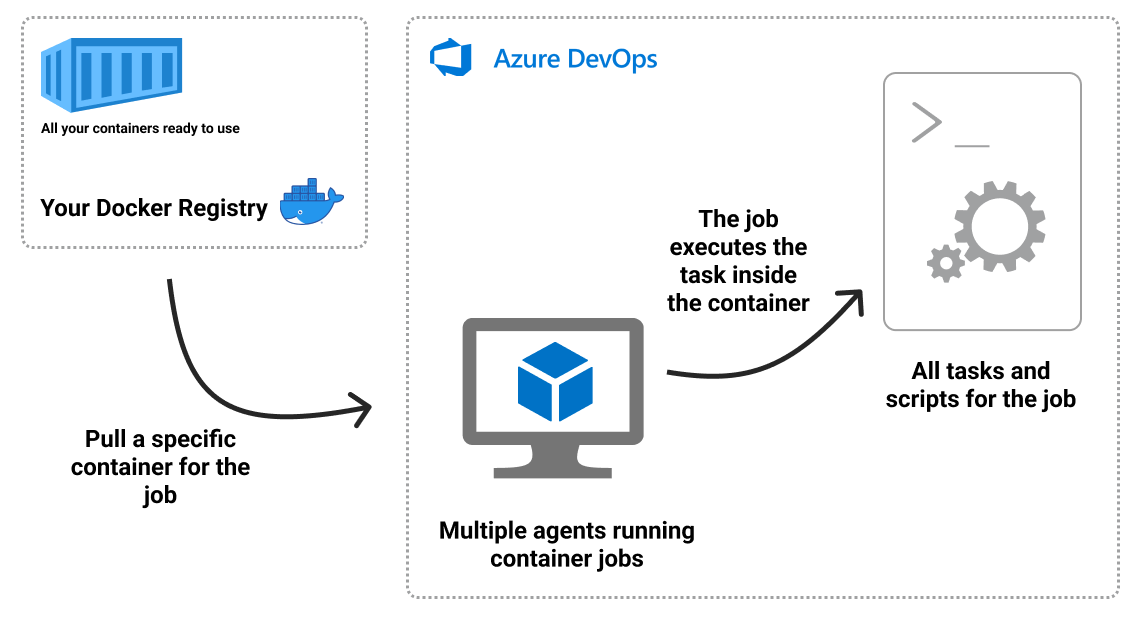
As you can see above you create a first image which will be your base image for all the others. Then you can build a specific image for each type of technology or project you have. The goal is to keep them as small as possible so that they launch quickly.
Create the base Docker image
To create your own Docker image you must fits the official requirements to make your image compatible with Azure DevOps.
Let’s create an image that we will use as a base for all other images:
FROM ubuntu:18.04

# To make it easier for build and release pipelines to run apt-get,
# configure apt to not require confirmation (assume the -y argument by default)
ENV DEBIAN_FRONTEND=noninteractive
RUN echo "APT::Get::Assume-Yes \"true\";" > /etc/apt/apt.conf.d/90assumeyes

RUN apt-get update && apt-get install -y --no-install-recommends \
    ca-certificates \
    curl \
    jq \
    git \
    netcat \
    nodejs \
    unzip \
    && rm -rf /var/lib/apt/lists/*
This Dockerfile declare a list of tools that Azure DevOps needs to execute any scripts and javascript tasks. You can also add some useful tools like jq or unzip for example. Then we build this image and publish it on a Docker Registry. We will call this first image your-username/container-base:1.0.0.
This base image can already run your bash scripts and tasks. Next step let’s create a specific image based on this one.
Create a specific Docker image
Let’s imagine we have a project that’s run a Dart server. By default the Dart framework is not installed on the online agent so it’s a good scenario for us. Let’s create this specific Docker image:
FROM your-username/container-base:1.0.0

RUN apt-get -y update && \
    apt-get -y upgrade

RUN apt-get update && apt-get install -y --no-install-recommends \
    apt-transport-https \
    wget \
    gpg
RUN wget -qO- https://dl-ssl.google.com/linux/linux_signing_key.pub | gpg --dearmor -o /usr/share/keyrings/dart.gpg
RUN echo 'deb [signed-by=/usr/share/keyrings/dart.gpg arch=amd64] https://storage.googleapis.com/download.dartlang.org/linux/debian stable main' | tee /etc/apt/sources.list.d/dart_stable.list

RUN apt-get update && apt-get install dart && rm -rf /var/lib/apt/lists/*

ENV PATH="$PATH:/usr/lib/dart/bin:$HOME/.pub-cache/bin"
As you can see we create an image with the latest stable version of Dart, of course you can create a generic image which will take a version of Dart as parameter. Then you will be able to build multiple version of this image, one for each version of Dart you want to target. We will call this second image your-username/container-dart:stable. We have our Dart image ready let’s use it!
Usage
To use an image as a container job it’s really easy you just need to specify it like this:
container:
  image: your-username/your-container:1.0.0
  endpoint: # Optional service connection for private Docker registries
Below is an example of a Dart command running in the job container we specified above:
trigger: none

pool:
  vmImage: ubuntu-latest

stages:
- stage: Build_Dart_Server
  jobs:
  - job:
    displayName: "Build Dart Server"
    container:
      image: your-username/container-dart:stable
    steps:
    - script: dart --version
      displayName: 'Check Dart version'

    # All your Dart commands here...
As you can see you just need to declare it inside the job section.
Final touch
Now you know how to easily create your own Docker containers to test, build and deploy your projects. It’s now time for you to create your own set of Docker images!
Happy coding!