- Azure
- Azure DevOps
When we set up Azure DevOps pipelines in our projects, as a good developer we always want to avoid duplication between our project so that’s why we use common templates repositories like we saw in a previous tutorial.
In this article, we are going to see an advanced use of these.
Use case
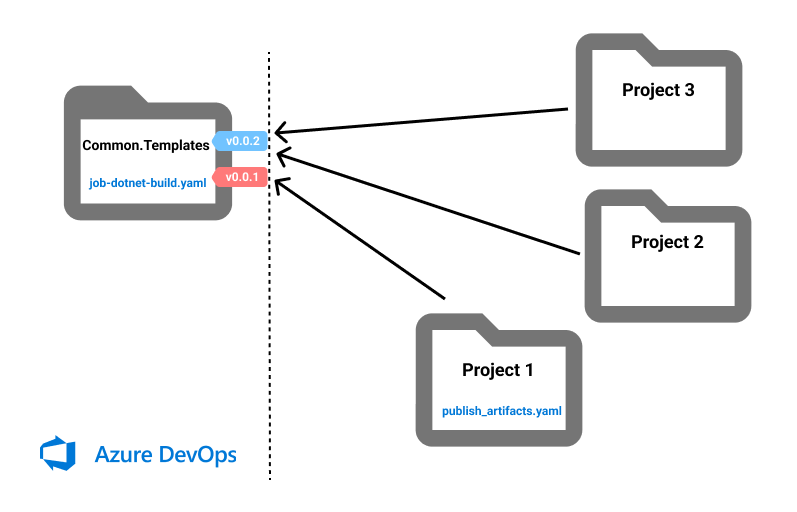
Let’s imagine you have 3 dotnet projects that share the same pipeline templates to build their application. However each one has a specific way to publish the result of the build.

You have multiples possibilities to achieve this:
- Put all specifics templates inside the common repository
- Copy paste the common templates in each Git repository and add the specific publish tasks
- Add post build steps to common templates so each project can add custom tasks
These 3 methods will work but:
- The first one break the genericity of your common templates so it’s not the good approach
- The second one add duplicates across your projects which is not acceptable
- The last one allows you to keep generic templates and keep specific templates inside each project
By all means, we will choose the last possibility.
Common templates
Here is a common job template to build a dotnet project:
parameters:
- name: preBuildSteps
  type: object
  default: []
- name: buildConfiguration
  type: string
  default: Release
- name: postBuildSteps
  type: object
  default: []

jobs:
- job: Build
  displayName: 'Build dotnet project'

  steps:
    - task: UseDotNet@2
      displayName: Install dotnet
      inputs:
        version: 6.0.x
        includePreviewVersions: false

    - task: NuGetToolInstaller@1
      displayName: Install Nuget tool

    - script: dotnet restore
      displayName: Restore package

    - ${{ parameters.preBuildSteps }}

    - script: dotnet build -c ${{ parameters.buildConfiguration }} --no-restore
      displayName: Build

    - ${{ parameters.postBuildSteps }}
This file called job-dotnet-build.yaml will be in a jobs folder inside a specific Git repository: Common.Templates.
As you can see above this job accepts pre build and post build steps which is ideal for us. To publish artifacts we will obviously use the postBuildSteps.
Use specific template
In one of our project we have this specific publish template:
parameters:
- name: artifactName
  type: string
  default: ''

steps:
  - script: dotnet publish demo.csproj -c Release --no-restore --output $(Build.ArtifactStagingDirectory)
    displayName: Publish package

  - task: PublishBuildArtifacts@1
    displayName: 'Publish Artifacts to Azure DevOps'
    inputs:
      pathToPublish: '$(Build.ArtifactStagingDirectory)'
      artifactName: '${{ parameters.artifactName }}'
This file called publish_artifacts.yaml will be in a templates > tasks folder inside the project.
Now it’s time to combine both!
In our azure-pipelines.yaml pipeline we will have first a reference to consume the Common.Templates repository:
resources:
  repositories:
    - repository: templates
      type: git
      name: Common.Templates
      ref: 'refs/tags/v0.0.1'
Notice that we target a specific tag to make sure that we always retrieve at each build the same version of the templates.
Then, here comes the tricky part:
stages:
- stage:
  jobs:
    - template: jobs/job-dotnet-build.yaml@templates # Template from the Common.Templates repository
      parameters:
        postBuildSteps:
            - template: templates/tasks/publish_artifacts.yaml@self # Template from the current directory
              parameters:
                artifactName: 'drop'
We call our common job template using the @templates keyword and to target the publish_artifacts.yaml template inside our project directory we absolutely needs to add the @self keyword. If you don’t do that, Azure DevOps will try to search the template inside the Common.Templates repository and you will get this kind of error:
/jobs/job-dotnet-build.yaml@templates: File /jobs/templates/tasks/publish_artifacts.yaml not found in repository https://dev.azure.com/organisation/project/_git/Common.Template branch refs/heads/main version 196ef908f49819986db5483dacac5e6221610502.
That’s why the @self keyword is important here.
Final touch
Now, you know how to combine your specific steps with reusable YAML templates inside Azure DevOps! You will find full source code in this Github repository.
Happy coding!
You liked this tutorial? Leave a star in the associated Github repository!