- Azure
- Azure DevOps
- Xamarin
When you do a project for a company you always work with multiple environments, for example: integration, prerelease and production. The number of environments often depends on your customers needs and personnal habits, each one has a lot of properties.
When you setup continuous integration and continous delivery you do it for each environment. The jobs and the tasks you used, will be exactly the same each time, the only things that change are the variables specific to each environment.
As a good developper you probably do not want to duplicate your configurations and then maintain them. It will be repetitive and a source of error to add or remove a configution for each environment. So now, the question is: Can you reuse your Azure pipeline accross your projects? The answer is YES!
In this tutorial I m going to show you one simple example based on the configuration of on of my previous tutorial: How to build, sign and deploy your Xamarin.Android application using Azure DevOps and App Center . It will be a good starting point to show you what can be done with Azure DevOps.
Overview
Here we have the previous azure-pipeline.yml that we will use as a base for this tutorial:
trigger:
- master

pool:
  vmImage: 'macos-latest'

variables:
  - group: android-pipeline

steps:

- task: NuGetToolInstaller@1

- task: NuGetCommand@2
  inputs:
    restoreSolution: '**/*.sln'

- task: XamarinAndroid@1
  inputs:
    projectFile: '**/**.csproj'
    outputDirectory: '$(outputDirectory)'
    configuration: '$(buildConfiguration)'

- task: AndroidSigning@3
  inputs:
    apkFiles: '**/*.apk'
    apksign: true
    apksignerKeystoreFile: 'production.jks'
    apksignerKeystorePassword: $(keystore.password)
    apksignerKeystoreAlias: $(key.alias)
    apksignerKeyPassword: $(key.password)
    apksignerArguments: --out $(outputDirectory)/app.release.apk
    zipalign: true

- task: AppCenterDistribute@3
  inputs:
    serverEndpoint: 'VSAC'
    appSlug: '$(appSlug)'
    appFile: '$(outputDirectory)/app.release.apk'
    releaseNotesOption: 'input'
    releaseNotesInput: 'New version'
    destinationType: 'groups'
    distributionGroupId: '$(distributionGroupId)'
In this pipeline definition, we can see that depending on the environment you decided to use, the signature of the apk will be done with a different certificate and your application will be sent to a different distribution group inside [App Center].
We can split this script into two parts: one for the build and one for the distribution of your application. We can also imagine a third part that can be the tests running with the unit tests and UI tests.
So you will have 3 stages:
- Run the tests
- Run the build
- Distribute your application
For the purpose of this tutorial I m going to show you only the build and the distribution stages and we will have two environments to manage: Pre-Production and Production.
Split into stages
Each stage we defined previously is define by the stage keyword inside Azure DevOps. So let’s create a new azure-pipeline.yml file and define our stages like this:
trigger:
- master

pool:
  vmImage: 'macos-latest'

stages:
  - stage: Build
    displayName: Build stage

  - stage: Distribute
    displayName: Distribute stage
Define our reusable jobs
Now let’s create a new folder next to your azure-pipeline.yml and call it templates. This folder will have all the reusable templates that you will be able to share between your projects.
Inside this folder create two files:
xamarin-android-build.ymlxamarin-android-distribute.yml
As their name suggests, the first one will have the build tasks and the second one the distribute tasks.
Inside the xamarin-android-build.yml let’s add the build section from our previous azure-pipeline.yml like this:
parameters:
  env: 'NOT_DEFINE'
  buildConfiguration: 'NOT_DEFINE'
  outputDirectory: 'NOT_DEFINE'
  keystoreFile: 'NOT_DEFINE'
  keystorePassword: 'NOT_DEFINE'
  keystoreAlias: 'NOT_DEFINE'
  keyPassword: 'NOT_DEFINE'

jobs:
  - job:
    displayName: Build ${{ parameters.env }}.
    steps:
        - task: NuGetToolInstaller@1

        - task: NuGetCommand@2
          inputs:
            restoreSolution: '**/*.sln'

        - task: XamarinAndroid@1
          inputs:
            projectFile: '**/**.csproj'
            outputDirectory: ${{ parameters.outputDirectory }}
            configuration: ${{ parameters.buildConfiguration }}

        - task: AndroidSigning@3
          inputs:
            apkFiles: '**/*.apk'
            apksign: true
            apksignerKeystoreFile: ${{ parameters.keystoreFile }}
            apksignerKeystorePassword: ${{ parameters.keystorePassword }}
            apksignerKeystoreAlias: ${{ parameters.keystoreAlias }}
            apksignerKeyPassword: ${{ parameters.keyPassword }}
            apksignerArguments: --out ${{ parameters.outputDirectory }}/app.${{ parameters.env }}.release.apk
            zipalign: true

        - task: PublishPipelineArtifact@1
          inputs:
            targetPath: '${{ parameters.outputDirectory}}/app.${{ parameters.env }}.release.apk'
            artifactName: 'build_${{ parameters.env}}'
As you can see on top of this file we define all the parameters that depend on the environment. Then we use it directly with the following syntax:
key: ${{ parameters.YOUR_PARAMETER_HERE }}
Each parameter is define with a default value to NOT_DEFINE so if your build failed and you see this value in the logs, you will know that you forgot to specify a value. You can also do something more precise like KEY_PASSWORD_NOT_DEFINE as a keyPassword default value for example.
At the end of this xamarin-android-build.yml you can see a new task called PublishPipelineArtifact@1. This task allow us to save the package generated between one stage to another. So we will keep our apk generated between the build stage and the distribution stage for each environment. This is useful because each stage is running one by one so you need to keep the result between each.
With that done let’s move to the xamarin-android-distribute.yml file and add this configuration:
parameters:
  env: 'NOT_DEFINE'
  outputDirectory: 'NOT_DEFINE'
  appSlug: 'NOT_DEFINE'
  distributionGroupId: 'NOT_DEFINE'
  serverEndpoint: 'VSAC'

jobs:
  - job:
    displayName: Distribute ${{ parameters.env }}.
    steps:
    - task: DownloadPipelineArtifact@2
      inputs:
        artifactName: 'build_${{ parameters.env}}'
        targetPath: ${{ parameters.outputDirectory }}

    - task: CopyFiles@2
      inputs:
        sourceFolder: ${{ parameters.outputDirectory }}
        contents: '**/app.${{ parameters.env }}.release.apk'
        TargetFolder: '$(Build.ArtifactStagingDirectory)/${{ parameters.env }}'

    - task: PublishBuildArtifacts@1
      inputs:
        pathtoPublish: '$(Build.ArtifactStagingDirectory)'
        artifactName: 'apks'
        publishLocation: 'container'

    - task: AppCenterDistribute@3
      inputs:
        serverEndpoint: ${{ parameters.serverEndpoint }}
        appSlug: ${{ parameters.appSlug }}
        appFile: '${{ parameters.outputDirectory }}/app.${{ parameters.env }}.release.apk'
        releaseNotesOption: 'input'
        releaseNotesInput: 'New version'
        destinationType: 'groups'
        distributionGroupId: ${{ parameters.distributionGroupId }}
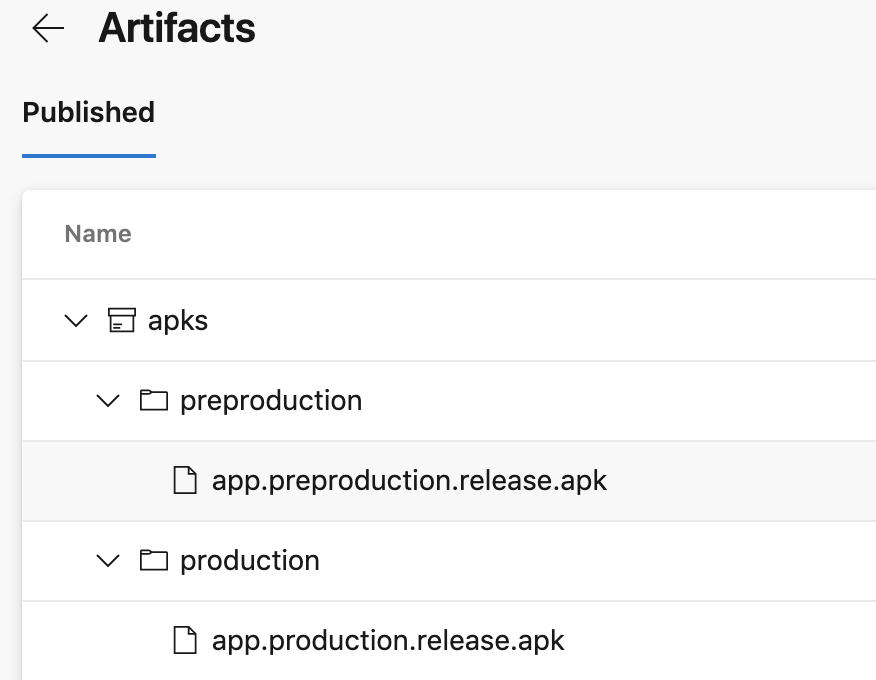
First of all we download our artifact (we previously published it inside the xamarin-android-build.yml) so we can start to distribute it. Then to give you an exemple more interesting in addition to the AppCenterDistribute@3 task, I added a CopyFiles@2 and a PublishBuildArtifacts@1 tasks to show you that we can publish our artifacts to a specific server for example. In this example it’s just regrouping all the apk files inside one artifact folder called apks inside Azure DevOps pipeline like this:
To send the artifacts generated to a specific server you will need to specify the
publishLocationandtargetPathproperties of thePublishBuildArtifacts@1task.
Then using the AppCenterDistribute@3 your application will automatically be published inside App Center. By default my serverEndpoint is always call VSAC feel free to overwride it as you like.
When you are satisfy with your differents templates, I recommend you to put all of them inside a specific repository so it will be reusable from any of your projects.
Use the templates
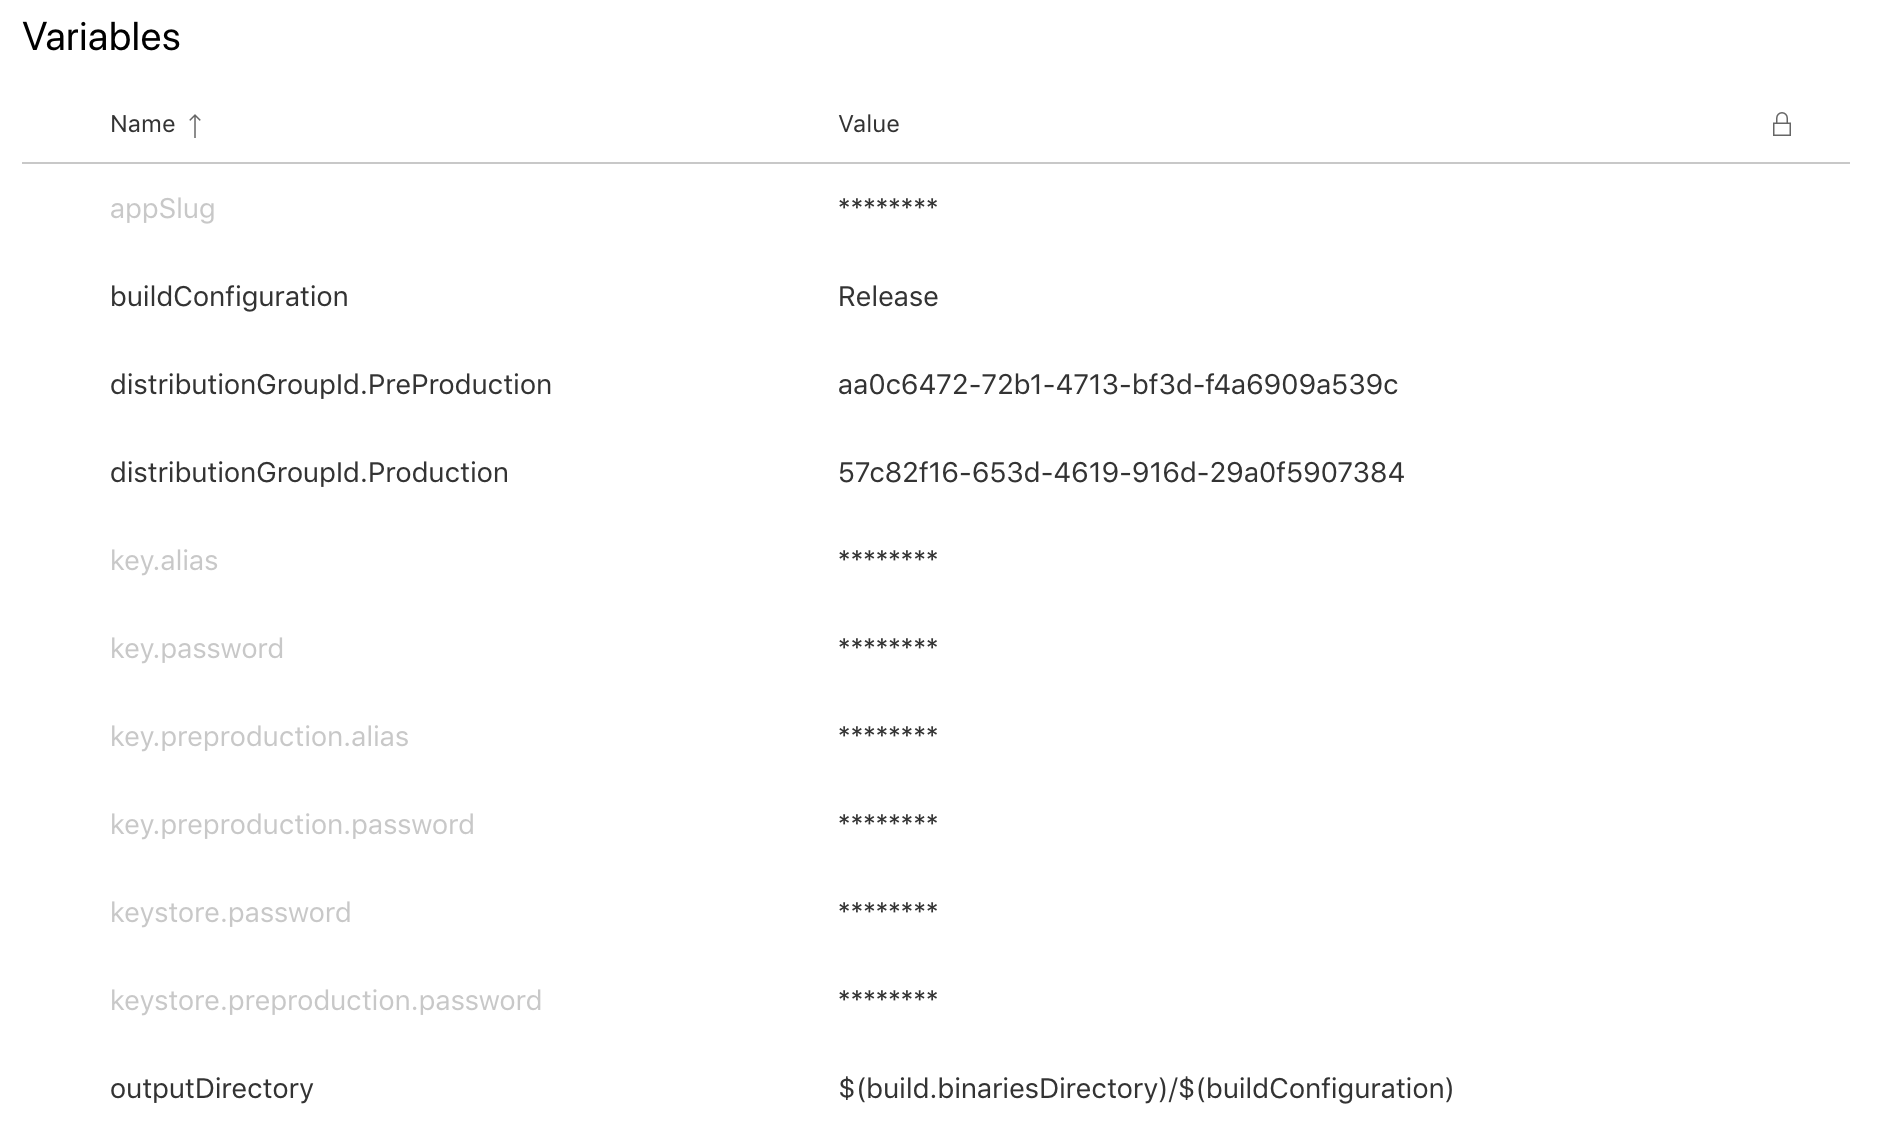
With our templates ready, it’s time to use them by passing our parameters depending on the environment. First of all do not forget to upload your certificates and load your variables group. If you are not familiar with the variables group you can look at my previous tutorial about it.
For this tutorial the variables group will be called android-pipeline and look like this:
Load it before your stages:
variables:
  - group: android-pipeline
Let’s define our two environments for build and distribution stages like this:
stages:
  - stage: Build
    displayName: Build stage
    jobs:
      - template: templates/xamarin-android-build.yml
        parameters:
          env: 'preproduction'
          buildConfiguration: '$(buildConfiguration)'
          outputDirectory: '$(outputDirectory)'
          keystoreFile: 'pre-production.jks'
          keystorePassword: $(keystore.preproduction.password)
          keystoreAlias: $(key.preproduction.alias)
          keyPassword: $(key.preproduction.password)

      - template: templates/xamarin-android-build.yml
        parameters:
          env: 'production'
          buildConfiguration: '$(buildConfiguration)'
          outputDirectory: '$(outputDirectory)'
          keystoreFile: 'production.jks'
          keystorePassword: $(keystore.password)
          keystoreAlias: $(key.alias)
          keyPassword: $(key.password)

  - stage: Distribute
    displayName: Distribute stage
    jobs:
      - template: templates/xamarin-android-distribute.yml
        parameters:
          env: 'preproduction'
          outputDirectory: '$(outputDirectory)'
          appSlug: '$(appSlug)'
          distributionGroupId: '$(distributionGroupId.PreProduction)'

      - template: templates/xamarin-android-distribute.yml
        parameters:
          env: 'production'
          outputDirectory: '$(outputDirectory)'
          appSlug: '$(appSlug)'
          distributionGroupId: '$(distributionGroupId.Production)'
As you can see we specify the template we need and pass the parameters to it.
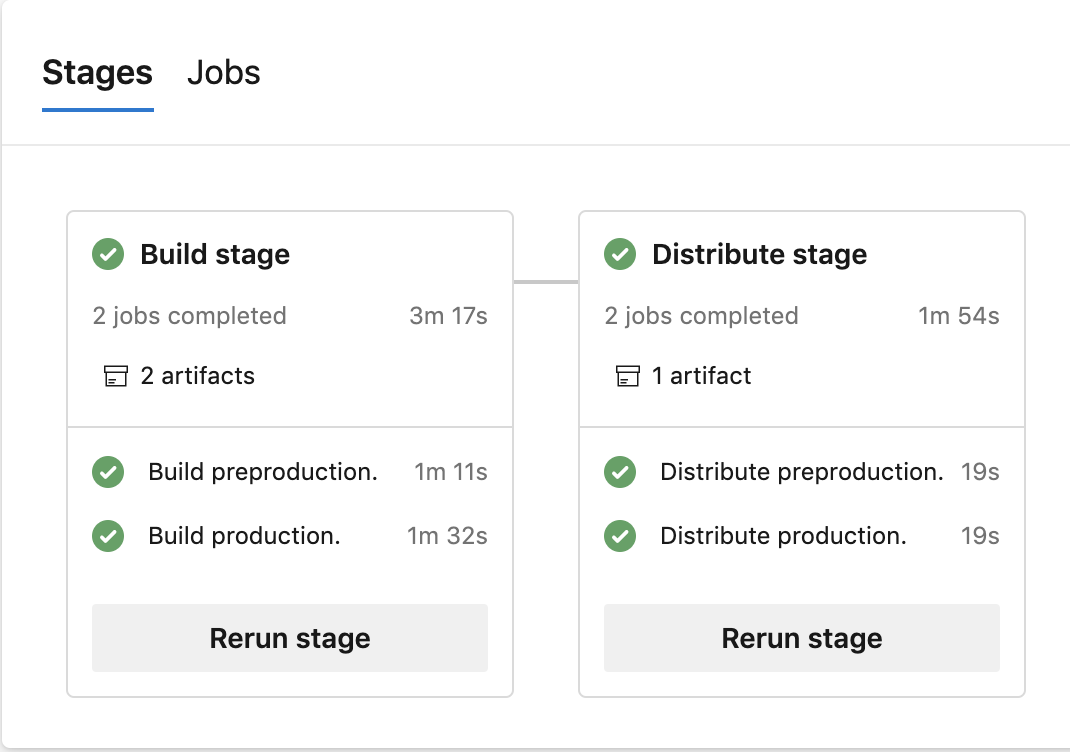
If you run this inside Azure DevOps you will see something like this:
Your application will be deployed into App Center as well.
Final touch
This is a simple introduction with a concrete example to show you all the benefits of this method:
- Reuse your Azure Pipeline between your projects
- Easy to maintain
- Easy to update
- Capitalize on each project
We can do a lot more optimisations with all the possibilities that Azure DevOps offers. I encourage you to try it by yourself!
Sources:
- Stages
- Download Pipeline Artifacts task
- Publish Pipeline Artifacts task
- NuGet Tool Installer task
- Nuget task
- Xamarin.Android task
- Android signing task
- App Center Distribute task
You will find full source code in this Github repository.
Happy coding !
You liked this tutorial ? Leave a star in the associated Github repository!