- Azure
- Azure DevOps
- Xamarin
When you are developing a project you always have multiples environments, for example:
- Development
- Staging
- Production
Each of these environments has its own configuration (server url, api keys…). To differentiate one environment version from another we often need to:
- Change the configuration file
- Increment the version of your application
- Add a banner on top of the icon to display the environment name
This tutorial is part of a full series of Azure DevOps tutorials using a Xamarin.Forms application as example. In the previous tutorial we setup the build and signing steps. This tutorial can be read independently and the concepts can be applied to any mobile technology you use.
If you want to take the same azure-pipeline.yml to start with, just clone the repos and move to the nightly_builds branch.
To help you better understand, here is an overall diagram of what has already been done in the previous tutorials and where the steps that we will see in this tutorial are done:
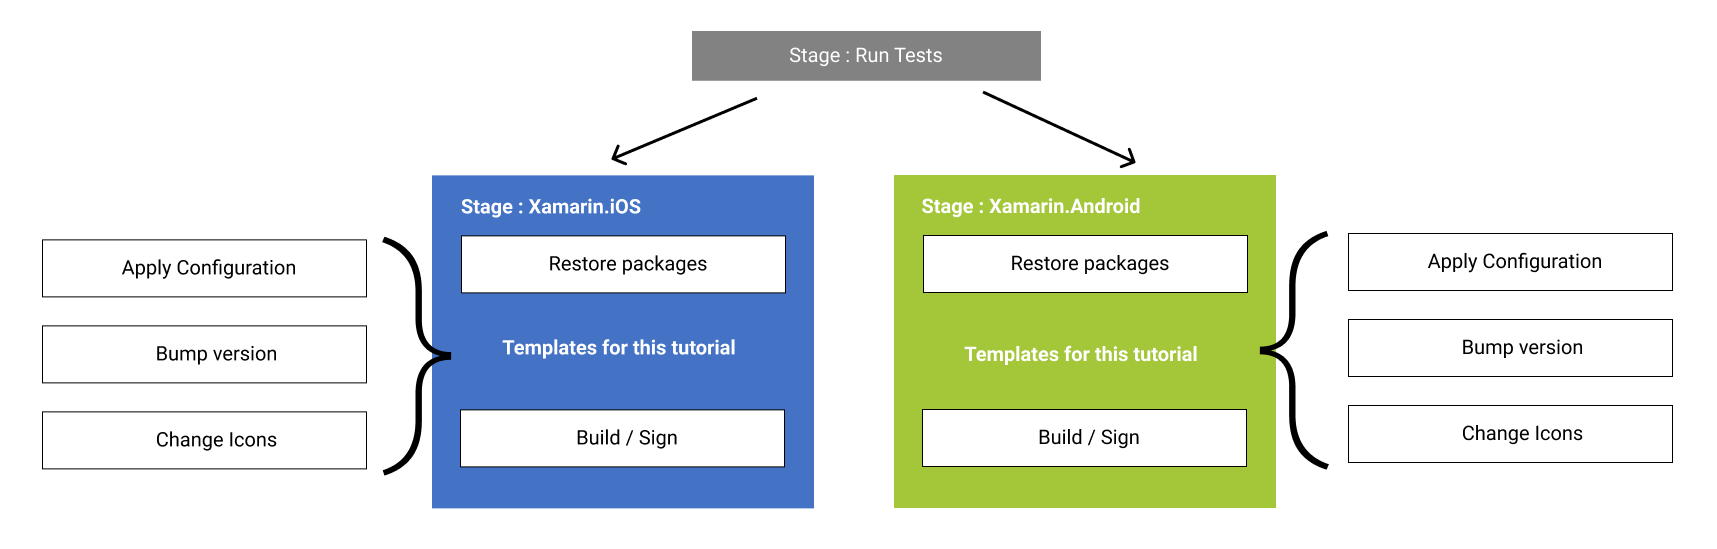
Config file
There are multiple ways to manage the configuration variables inside your Xamarin application. You can for instance create your build configuration inside your solution or use a JSON configuration file.
By using a configuration file, your config will be deserialized when your application starts and all your environment variables are going to be ready to use.
The other benefits of using a configuration file in JSON is that you can build your application one time and then for each environment you will change the config file and sign it. This will save you a lot of build time in your pipelines.
For the purpose of this tutorial let’s consider that we have a configurations folder at the root of your solution project like in the Github repository with multiple JSON environment files like this:
|- configurations
      |- config-debug.json
      |- config-prerelease.json
      |- config-release.json
The goal is to copy and paste the content of one of these files into the final config.json file inside the Assets directory on each platform.
To achieve this, let’s create a new template called copy_content_file.yml inside the templates directory at the root of our solution project:
parameters:
  sourceFile: ''
  targetFile: ''

steps:
- task: Bash@3
  inputs:
    targetType: 'inline'
    script: cp -fr ${{ parameters.sourceFile }} ${{ parameters.targetFile }}
This template is called before each iOS and Android build start. For Android it will be setup like this:
- template: templates/copy_content_file.yml
  parameters:
    sourceFile: '$(Build.SourcesDirectory)/configurations/config-$(buildConfiguration).json'
    targetFile: '$(Build.SourcesDirectory)/XamarinDevOps.Android/Assets/config.json'
and for iOS like below:
- template: templates/copy_content_file.yml
  parameters:
    sourceFile: '$(Build.SourcesDirectory)/configurations/config-$(buildConfiguration).json'
    targetFile: '$(Build.SourcesDirectory)/XamarinDevOps.iOS/Assets/config.json'
If you want to see how to setup correctly a config.json file into your application, it is really recommended for you to read this great post of John Thiriet about it.
Bump version
After we setup the right configuration let’s take a look at the version of your application. In fact, to be able to push a new version of it in the stores of your choice, each time you need to bump the version of your application. Depending on the type of mobile technologies you use, you need to update the AndroidManifest.xml or the build.gradle for Android and the Info.plist for iOS.
To do that I developed a series of extensions to extract the version from the Git tag and automatically change the version of the config files that were previously mentioned for you.
For more details about these extensions feel free to take a look at my previous tutorial to know more about it.
Because we use Xamarin, we need to update the AndroidManifest.xml and the Info.plist files. Make sure you have a minimum of one tag specified on your branch to be able to run the following tasks. For this tutorial I put a tag v0.0.1.
Android
Create a new template called bump_android_manifest_version.yml inside the templates folder like this:
parameters:
  androidManifestPath: ''

steps:
  - task: ExtractVersionFromTag@1
  - task: UpdateAndroidVersionManifest@1
    inputs:
      androidManifestPath: '${{ parameters.androidManifestPath }}'
This will get the version of the last tag on your git repository and update the AndroidManifest.xml accordingly. Then call this template before you build your Android project:
- template: templates/bump_android_manifest_version.yml
  parameters:
    androidManifestPath: '$(Build.SourcesDirectory)/XamarinDevOps.Android/Properties/AndroidManifest.xml'
iOS
Now let’s do the equivalent for iOS, create a file and name it bump_ios_version.yml. In this template we update the version of the Info.plist based on the git tag:
parameters:
  infoPlistPath: ''

steps:
  - task: ExtractVersionFromTag@1
  - task: UpdateiOSVersionInfoPlist@1
    inputs:
      infoPlistPath: '${{ parameters.infoPlistPath }}'
Call this template just before you build your iOS project:
- template: templates/bump_ios_version.yml
  parameters:
    infoPlistPath: '$(Build.SourcesDirectory)/XamarinDevOps.iOS/Info.plist'
Differentiate the application icon
This part is not mandatory, it’s only a help for you to install multiple configurations of your application on the same device and to switch smoothly between each of them. The idea is to add a banner on top of your application icon with the name of your environment. To do that I created an Azure DevOps extension called Launch Icon Badge.
For more information about this extension, feel free to look at my previous tutorial to know more about it.
Let’s see how to use it in a new template called icon_banner.yml; it is always added in the templates directory of your project:
parameters:
  sourceFolder: '$(Build.SourcesDirectory)'
  contents: '**/*.png'
  versionNamePosition: 'bottomRight'
  versionName: ''

steps:
  - task: LaunchIconBadge@1
    inputs:
      sourceFolder: '${{ parameters.sourceFolder }}'
      contents: '${{ parameters.contents }}'
      bannerVersionNamePosition: '${{ parameters.versionNamePosition }}'
      bannerVersionNameText: '${{ parameters.versionName }}'
With finishing that, for Android, just call this template before building the project:
- template: templates/icon_banner.yml
  parameters:
    sourceFolder: '$(Build.SourcesDirectory)/XamarinDevOps.Android/Resources'
    contents: '**/icon.png'
    versionName: '$(buildConfiguration)'
same thing for iOS:
- template: templates/icon_banner.yml
  parameters:
    sourceFolder: '$(Build.SourcesDirectory)/XamarinDevOps.iOS/Assets.xcassets/AppIcon.appiconset'
    versionName: '$(buildConfiguration)'
In this exemple the version name will be the value of $(buildConfiguration) which correspond to the build configuration currently running. You can change it as you like. It’s technically not necessary to create a template just for one task like we did here but this can be usefull if you want to abstract the behavior of your template and update it only one time if necessary in the future.
Final touch
The environment of your application is now ready, you can build your pipeline for each environment. You will find full source code in this Github repository in the manage_environment branch. This will show you a completed example based on the previous tutorials of the series.
What’s next?
In the next tutorial of this series we will focus on preparing your application for distribution.
Happy coding!
You liked this tutorial? Leave a star in the associated Github repository!