- Azure
- Azure DevOps
- Xamarin
When you develop a mobile application you often work by a team; each team member codes a feature and propose it by the system of Pull Request to the other developers. When one or two developers of your team validate it, your code will get merged with the rest of the code.
To be sure your project always compiles, it is recommanded to build it regulary in a reference environment, which is in our case Azure DevOps. To do that, one way is to build your project every business day at midnight.
In this tutorial I am going to show you how to setup a nightly build using a Xamarin.Forms application.
In my previous tutorial we saw how to run and publish Unit Tests inside Azure DevOps. This tutorial is part of a full series of Azure DevOps tutorials using a Xamarin.Forms application as an example. This tutorial can be read independently and the concepts can be applied to any mobile technology you use.
Setup your pipeline
Let’s go to Azure DevOps and create a new pipeline.
Inside the Pipelines tab create a New pipeline and follow the 4 steps to get the source code from the correct repository. Azure DevOps will automatically create a new azure-pipelines.yml at the root of your project folder. This is where the job definition will be set and then interpreted by Azure DevOps.
If you did the previous tutorial, you already have a template called init_restore.yml to restore the Nuget packages of your project in a templates folder at the root of your solution project that contains these lines:
parameters:
  solutionPath: ''

steps:
- task: NuGetToolInstaller@1
- task: NuGetCommand@2
  inputs:
    restoreSolution: '${{ parameters.solutionPath }}'
Structure
We will use something called stages which allows us to run different jobs on separate agents. Below we defined a list of stages, one for iOS and one for Android. In each one we restore our Nuget packages using the template we previously created.
trigger:
  - master

pool:
  vmImage: 'macOS-10.14'

stages:
  - stage: Build_Xamarin_Android
    dependsOn: []
    jobs:
      - job:
        displayName: 'Build Xamarin.Android'
        workspace:
          clean: all
        steps:
          - template: templates/init_restore.yml
            parameters:
              solutionPath: '$(solutionPath)'

          ## Steps to build your Xamarin Android application

  - stage: Build_Xamarin_iOS
    dependsOn: []
    jobs:
      - job:
        displayName: 'Build Xamarin.iOS'
        workspace:
          clean: all
        steps:
          - template: templates/init_restore.yml
            parameters:
              solutionPath: '$(solutionPath)'

          ## Steps to build your Xamarin Android application
By default each stage depends on the previous one so they will start one by one. To avoid having your stage depending from each other, you just need to set the dependsOn property to an empty array like above. If you have upgraded your Azure DevOps suscription you will be able to run more than one job in parallel. So it will build your iOS and Android application at the same time. To check that, go to Project settings > Parallel jobs and you will see the number of parallel jobs you have.
Build steps
It’s time to add the build and sign tasks based on what I have showed you in the previous tutorials.
Setup the variables
Let’s create a new file called variables.yml inside our templates folder. It will contain all the variables for the pipeline. By separating them inside a specific file it will be easier to maintain.
Below are the variables we need at this point to be able to build our project:
variables:
  - name: xamarinSdkVersion
    value: '6_6_0'
  - name: solutionPath
    value: '**/*.sln'
  - name: buildConfiguration
    value: 'Release'
The current latest version of the Xamarin SDK is 6.6.0 that’s why we set the value of xamarinSdkVersion to 6_6_0. This also allow us a new feature for Xamarin.Android: Android App Bundle!
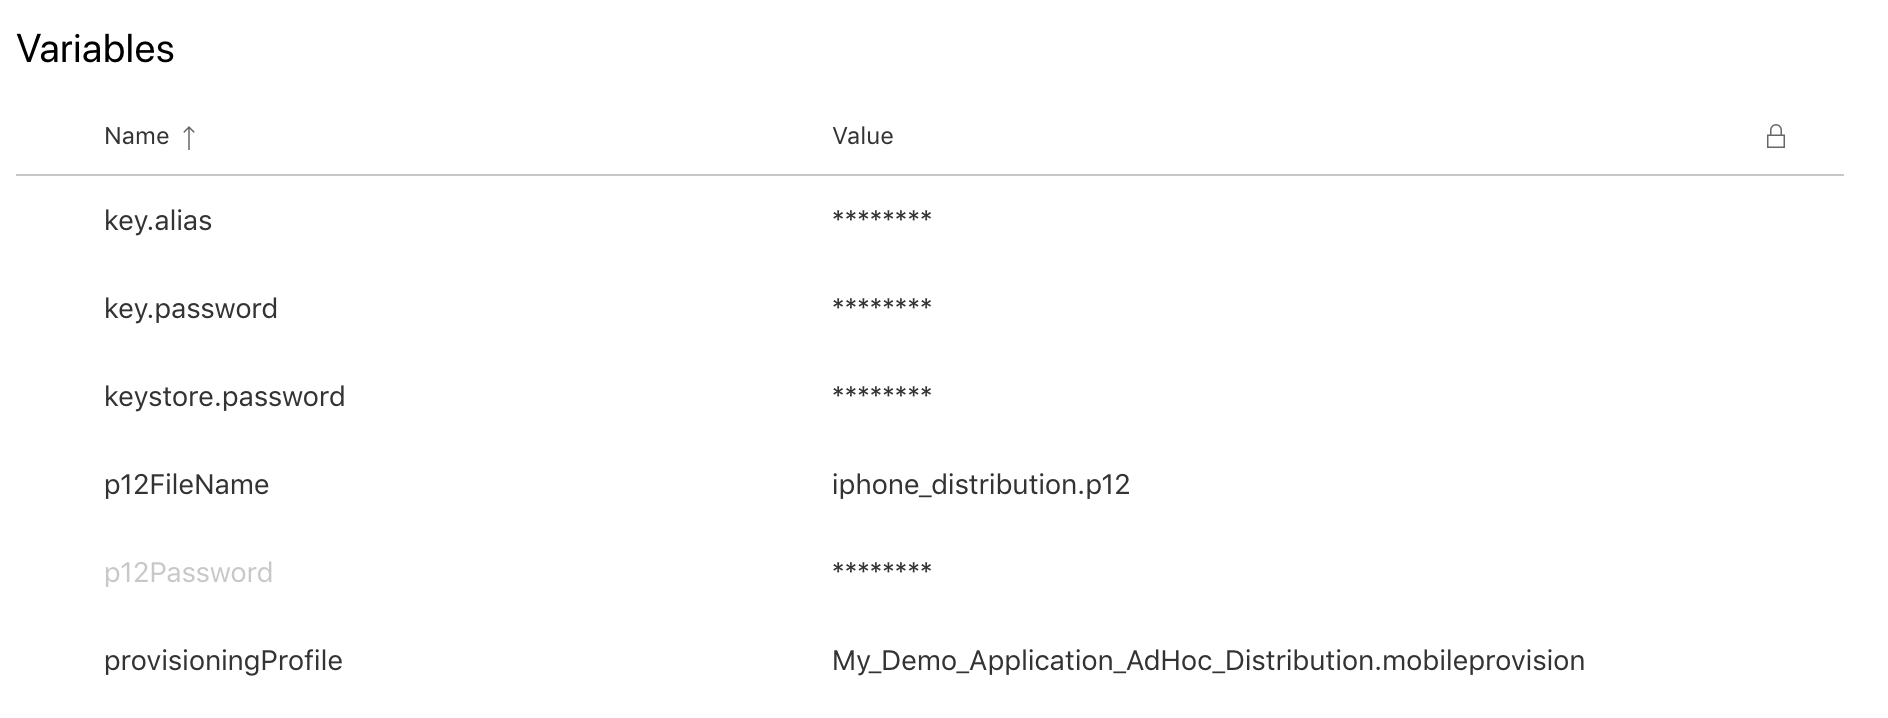
For security reasons we will need to create variables group to store alias and passwords associated to the keystore and the provisioning profile to sign our application. If you are not familiar with this you can look at my previous tutorial about it.
For this tutorial the variable groups will be called xamarin-full-pipeline, they contain all the keystore passwords and provisioning profile. It will look like this:

Do not forget to upload your provisioning profile and your keystore to the secured files to be able to sign your applications.
Before your steps let’s load the variables group and the variables.yml like this:
variables:
  - group: xamarin-full-pipeline
  - template: templates/variables.yml
Xamarin.Android
For Android let’s create a new template called build_xamarin_android.yml inside the templates folder. This template will set a custom version for Xamarin SDK, build the Android application and sign it:
parameters:
  xamarinSdkVersion: ''
  packageFormat: 'apk'
  projectFile: ''
  buildConfiguration: ''
  apksignerKeystoreFile: ''
  apksignerKeystorePassword: ''
  apksignerKeyPassword: ''

steps:
- script: sudo $AGENT_HOMEDIRECTORY/scripts/select-xamarin-sdk.sh ${{ parameters.xamarinSdkVersion }}
  displayName: 'Select the Xamarin SDK version'
  enabled: true

- task: DownloadSecureFile@1
  name: keyStore
  displayName: "Download keystore from secure files"
  inputs:
    secureFile: '${{ parameters.apksignerKeystoreFile }}'

- task: Bash@3
  displayName: "Download keystore from secure files"
  inputs:
    targetType: "inline"
    script: |
      msbuild -restore ${{ parameters.projectFile }} -t:SignAndroidPackage -p:AndroidPackageFormat=${{ parameters.packageFormat }} -p:Configuration=${{ parameters.buildConfiguration }} -p:AndroidKeyStore=True -p:AndroidSigningKeyStore=$(keyStore.secureFilePath) -p:AndroidSigningStorePass=${{ parameters.apksignerKeystorePassword }} -p:AndroidSigningKeyAlias=${{ parameters.apksignerKeystoreAlias }} -p:AndroidSigningKeyPass=${{ parameters.apksignerKeyPassword }}
As you can see this template allows us to build and sign an apk or aab (Android App Bundle), according to the value of the property packageFormat you choose: apk or aab.
If you want to understand in details how a Xamarin.Android application can be built using Azure DevOps it is recommended for you to read the previous tutorials about it:
Now inside our azure-pipelines.yml we can use this template just after restoring the Nugets packages for the Xamarin.Android application:
- template: templates/build_xamarin_android.yml
  parameters:
    xamarinSdkVersion: '$(xamarinSdkVersion)'
    packageFormat: 'aab' # Choose apk or aab depending on your needs
    projectFile: '$(Build.SourcesDirectory)/XamarinDevOps.Android/*.csproj'
    buildConfiguration: '$(buildConfiguration)'
    apksignerKeystoreFile: 'production.jks'
    apksignerKeystorePassword: $(keystore.password)
    apksignerKeystoreAlias: $(key.alias)
    apksignerKeyPassword: $(key.password)
Xamarin.iOS
For iOS let’s create a new template called build_xamarin_ios_ipa.yml inside the templates folder. This template will look like the previous one; set a custom version for Xamarin SDK, build the iOS application and sign it:
parameters:
  xamarinSdkVersion: ''
  p12FileName: ''
  p12Password: ''
  provisioningProfile: ''
  solutionPath: ''
  buildConfiguration: ''
  signingIdentity: ''
  signingProvisioningProfileID: ''

steps:
  - script: sudo $AGENT_HOMEDIRECTORY/scripts/select-xamarin-sdk.sh ${{ parameters.xamarinSdkVersion }}
    displayName: 'Select the Xamarin SDK version'
    enabled: true

  - task: InstallAppleCertificate@2
    inputs:
      certSecureFile: '${{ parameters.p12FileName }}'
      certPwd: '${{ parameters.p12Password }}'
      keychain: 'temp'
      deleteCert: true

  - task: InstallAppleProvisioningProfile@1
    inputs:
      provisioningProfileLocation: 'secureFiles'
      provProfileSecureFile: '${{ parameters.provisioningProfile }}'
      removeProfile: true

  - task: XamariniOS@2
    inputs:
      solutionFile: '${{ parameters.solutionPath }}'
      configuration: '${{ parameters.buildConfiguration }}'
      packageApp: true
      buildForSimulator: false
      runNugetRestore: false
      signingIdentity: '${{ parameters.signingIdentity }}'
      signingProvisioningProfileID: '${{ parameters.signingProvisioningProfileID }}'
If you want to understand in details what each task does in this template it is recommended for you to read my previous tutorial about it.
Go back to our azure-pipelines.yml and call this template just after restoring the Nugets packages for the Xamarin.iOS application:
- template: templates/build_xamarin_ios_ipa.yml
  parameters:
    xamarinSdkVersion: '$(xamarinSdkVersion)'
    p12FileName: '$(p12FileName)'
    p12Password: '$(p12Password)'
    provisioningProfile: '$(provisioningProfile)'
    solutionPath: '$(solutionPath)'
    buildConfiguration: '$(buildConfiguration)'
    signingIdentity: '$(APPLE_CERTIFICATE_SIGNING_IDENTITY)'
    signingProvisioningProfileID: '$(APPLE_PROV_PROFILE_UUID)'
Add a cron
Next step we need to add the ability to our pipeline to be started authomatically every night during the week. This will compile our application and when you go back to office the day after, you just need to check if everything succeeded. This will ensure that your code also compile outside of your personnal machine.
To do that, before defining the stages inside your azure-pipeline.yml add these lines:
schedules:
- cron: "0 0 * * 1-5"
  displayName: Daily midnight build
  branches:
    include:
    - master
What the cron task does is running the pipeline from monday to friday at midnight.
- The first
0correspond to the minutes from 0 to 59 - The second
0correspond to the hours from 0 to 23 - The first
*correspond to the days from 1 to 31 - The second
*correspond to the month from 1 to 12 - The
1-5correspond to the days, 0 is sunday
Add Unit Tests
Now, based on the previous tutorial we will add a stage to run our Unit Tests before the stages to build our iOS and Android application:
- stage: Run_Unit_Tests
  jobs:
    - job:
      displayName: 'Run Unit Tests'
      steps:
        - template: templates/run_unit_tests.yml
          parameters:
            solutionPath: '$(solutionPath)'
            projects: '$(Build.SourcesDirectory)/XamarinDevOps.Tests/*.csproj'
            buildConfiguration: '$(buildConfiguration)'
Then to run the Tests before you build your application set the dependsOn value of the iOS and Android stage like this:
dependsOn: Run_Unit_Tests
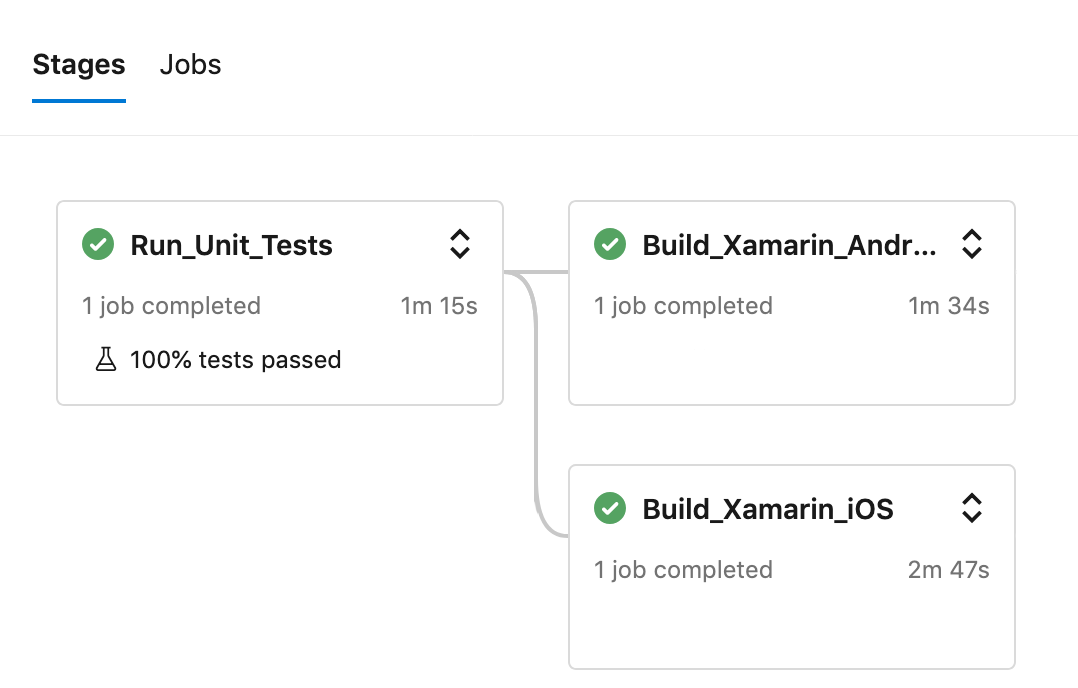
If you do it correctly and run your pipeline you will see something like this:

Final touch
Now you have a nightly build setup, that ensure your project build successfully and you have some reusable templates across your projects.
What’s next?
In the next tutorial of this series we will focus on managing your application by environment.
Sources:
You will find full source code in this Github repository in the nightly_builds branch.
Happy coding!
You liked this tutorial? Leave a star in the associated Github repository!